Maintaining optimal water flow is crucial for the health and functionality of a swimming pool. Appropriate water circulation ensures proper filtration, efficient chemical distribution, and overall water quality.
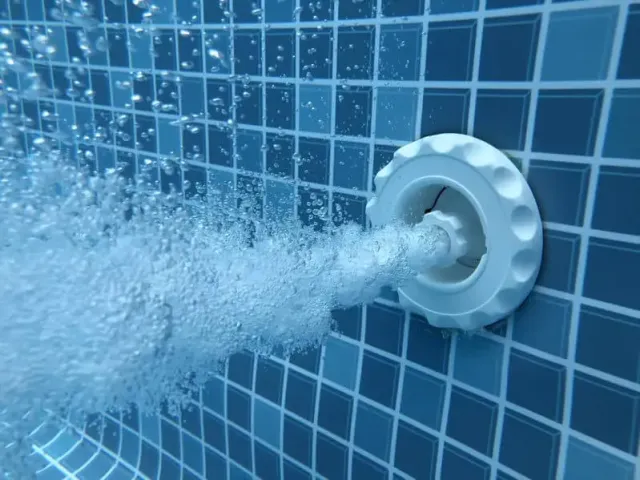
Low pressure from the return jets is one of the challenges that pool owners frequently face. This problem can lead to ineffective filtration, compromised water quality, and potential equipment damage.
In this article, we will dive into the diagnosis and resolution of low-pressure issues that affect pool return jets. By understanding the root causes of this problem and implementing appropriate solutions, you can restore the optimal flow and enjoy your pool in its pristine condition.
One of the primary culprits behind low pressure in pool return jets is the presence of clogged filters. Whether you have a diatomaceous earth (DE), sand, or cartridge filter, debris, and contaminants can accumulate and obstruct water flow over time. These particles hinder the filtration process, reducing pressure in the return jets.
For those using DE Filters, the condition of the filter grids plays a crucial role in maintaining adequate pressure.
Over time, these grids can become caked with residual DE powder, minerals, and other debris. This accumulation restricts water flow and diminishes pressure.
Additionally, damaged or torn filter grids can escalate the issue, further impeding water flow back into the pool. Inspecting and cleaning these filter grids regularly ensures optimal performance and prevents low-pressure problems in the return jets.
Warning Signs of Low Pressure
A noticeable decrease in water flow from the pool’s return jets is a telltale sign of low pressure.
Instead of the strong and steady stream typically experienced, you may observe a feeble trickle or even sporadic bursts of water.
This lack of forceful flow not only affects the pool’s aesthetics but also indicates an underlying issue that demands attention.
Low pressure in the return jets directly impacts the pool’s circulation and filtration system.
When water flow is compromised, the circulation process becomes sluggish and ineffective. As a result, the pool water fails to adequately mix, distribute chemicals, and eliminate debris, leading to poor water quality.
Inefficient filtration worsens this problem, allowing particles and contaminants to linger in the water for longer periods.
Ignoring low-pressure issues can have detrimental consequences for pool equipment. Insufficient flow strains components such as pumps, heaters, and salt systems, putting them at risk of damage or malfunction.
These vital peripherals require a certain level of water flow to operate optimally.
Insufficient pressure places undue stress on the equipment, potentially leading to premature wear, increased energy consumption, or even complete system failure.
It is crucial to address low-pressure symptoms promptly to maintain the pool’s functionality, water quality, and equipment longevity.
By recognizing these warning signs, you can take necessary measures to diagnose and resolve the underlying causes of low pressure in the return jets.
Backwashing is a crucial maintenance procedure for DE and sand filters that help alleviate low-pressure issues. During regular operation, these filters gradually accumulate debris and contaminants, causing a buildup that restricts water flow.
Backwashing is a process in which water is reversed through the filter, dislodging trapped particles and flushing them out of the system. This action restores the filter’s efficiency and promotes improved water flow.
1. Turn off the pool pump.
Before initiating the backwashing process, ensure the pool pump is turned off to prevent damage or accidents.
2. Locate the filter valve.
Find the multiport valve or the push-pull valve on the filter system. This valve controls the flow of water through the filter.
3. Set the valve to the “Backwash” position.
Rotate the valve handle to the “Backwash” position, allowing water to flow reverse through the filter.
4. Turn on the pump
Switch on the pool pump to initiate the backwashing process.
5. Monitor the sight glass or pressure gauge.
Observe the sight glass or pressure gauge as the water flows backward through the filter. The water may appear cloudy or dirty initially but should gradually clear up as the backwashing progresses.
6. Continue backwashing until the water appears clear.
Keep the pump and valve running in the “Backwash” position until the water flowing through the sight glass or pressure gauge runs clear.
7. Rinse the filter
After backwashing, set the valve to the “Rinse” position.
This step helps to settle the filter media and clear any remaining debris from the system.
8. Return to normal filtration mode.
Finally, set the valve back to normal filtration and turn on the pump to resume regular operation.
By following these step-by-step instructions for backwashing DE and sand filters, you can effectively address low-pressure issues caused by clogged filters.
Regular maintenance and adherence to proper backwashing techniques will help maintain optimal water flow and preserve the overall performance of the filtration system.
Regular maintenance of cartridges in cartridge filters is vital to ensure optimal filtration and prevent low-pressure issues. Cartridges are designed to capture fine particles and debris, but over time, they can become clogged, hindering water flow and reducing the efficiency of the filtration system.
By performing routine cleaning and maintenance, pool owners can maximize the lifespan of their cartridges and maintain consistent flow through the return jets.
1. Turn off the pool pump.
Before cleaning, switch off the pool pump to prevent any damage.
2. Remove the cartridge
Locate the cartridge housing and carefully remove the cartridge from its position. Pay attention to any clips or fasteners that secure the cartridge in place.
3. Rinse the cartridge
Use a garden hose with a nozzle attachment to thoroughly rinse the cartridge. Direct the water in the opposite direction of the pleats to dislodge any trapped debris. Ensure all visible dirt and contaminants are removed.
4. Soak the cartridge
Fill a large bucket or container with a cartridge cleaner solution for a mixture of water and mild detergent. Place the cartridge in the solution and let it soak for the recommended duration specified by the manufacturer.
5. Scrub the cartridge
After soaking, gently scrub the cartridge with a soft-bristle brush, paying close attention to the pleats. This step helps to loosen and remove any remaining debris.
6. Rinse again
Rinse the cartridge thoroughly with clean water to eliminate any residual cleaning solution for detergent.
7. Inspect for damage
While cleaning, inspect the cartridge for signs of damage, such as tears, cracks, or worn-out pleats. Consider replacing the cartridge to maintain optimal filtration if any damage is detected.
9. Reinstall the cartridge
Once the cartridge is clean and free from damage, carefully place it back into the cartridge housing. Ensure it is securely positioned and properly aligned.
10. Restart the pool pump.
Turn the pool pump back on and observe the return jets for improved water flow. The clean cartridge should restore adequate pressure and optimize filtration.
By adhering to these instructions for cleaning cartridges in cartridge filters, you can effectively eliminate low-pressure issues and regain the proper functioning of your filtration system.
Regular maintenance of cartridges is crucial for maintaining water flow and maximizing the efficiency of the pool’s circulation system.
Filter grids play a critical role in DE (Diatomaceous earth) filters, as they trap and remove fine particles from the pool water. These grids consist of interconnected plastic or fabric frames covered with a fine mesh or fabric.
As the water flows through the filter, the diatomaceous earth coating on the grids captures even the tiniest impurities, ensuring clean and clear pool water.
Understanding the importance of these filter grids helps pool owners appreciate the need for proper maintenance and cleaning.
1. Turn off the pool pump.
Before performing any maintenance on DE filters, it is crucial to turn off the pool pump to ensure safety.
2. Open the filter tank.
Locate the filter tank and carefully open it by releasing clamps or screws securing the lid. Follow the manufacturer’s instructions for proper access to the filter grids.
3. Remove the filter grids.
Carefully remove the filter grids from the filter tank. Please take note of their arrangement and orientation for correct reassembly.
4. Rinse off excess DE.
Gently rinse any excess diatomaceous earth from the filter grids using a garden hose with a gentle spray. Avoid using high-pressure water as it may damage the grids.
5. Soak the filter grids.
Prepare a water solution and a filter cleaner specifically designed for DE filters. Place the filter grids in a large container or bathtub filled with the solution and allow them to soak for the recommended duration.
6. Scrub the filter grids.
After soaking, use a soft-bristle brush to carefully scrub the filter grids, paying close attention to the pleats and mesh. This step helps remove embedded dirt and debris.
7. Rinse thoroughly
Rinse the filter grids with clean water until all the cleaning solution and residue are completely removed.
8. Inspect for damage
While cleaning, inspect the filter grids for any signs of damage, such as tears, cracks, or prayed mesh. Replace any damaged grids to ensure optimal filtration efficiency.
9. Reassemble and reinstall the filter grids.
Once the filter grids are clean and dry, reassemble them in the correct order and position them inside the filter tank. Secure the lid of the filter tank, ensuring proper alignment and tightening of clamps or screws.
10. Restart the pool pump.
Turn on the pool pump and observe the return jets for improved water flow. The clean filter grids will restore proper pressure and enhance the filtration performance of the DE filter.
By following these proper maintenance and cleaning techniques for filter grids in DE filters, pool owners can effectively address low-pressure issues and maintain optimal filtration efficiency. Regular cleaning and maintenance of filter grids ensure the longevity of the DE filter and contribute to a clean and enjoyable swimming experience.
Clean filters are vital in maintaining efficient water flow throughout a pool system.
When filters are dirty or clogged, water flow is restricted, leading to reduced performance and potential issues with various pool peripherals, including salt systems and heaters. Understanding the relationship between clean filters and efficient flow helps us comprehend the impact on these important components of the pool system.
When the pool filter is dirty, and flow is restricted, salt systems and heaters are often the first to be affected, resulting in error messages and operational issues. These errors are designed to alert pool owners or service professionals about the compromised flow and potential damage to the equipment.
Here are some common errors that may arise due to restricted flow:
Low Flow or Flow Sensor Error: A salt system uses proper water flow to generate chlorine and maintain optimal pool chemistry. When the flow is restricted, the flow sensors in the salt system may not detect sufficient water movement, triggering a low flow or flow sensor error. This error message indicates that the salt system does not receive the required flow rate to operate effectively.
Low Salt or Salt Cell Error: If the flow to the salt cell is inadequate due to a dirty filter, the salt system may detect lower salt levels than expected or encounter difficulty producing the required chlorine. This can lead to a low salt or salt cell error messages, indicating the need to address the restricted flow issue and ensure proper salt system operation.
Flow Sensor Error: Heaters incorporate flow sensors to monitor the water flow and ensure proper heat exchange. When the filter is dirty, and flow is restricted, the flow sensor may detect insufficient flow or irregular patterns, triggering a flow sensor error. This error message indicates that the heater does not receive the required water flow to operate safely and efficiently.
Overheating or High Limit Error: Inadequate water flow due to a dirty filter can impede the heater’s cooling and heat dissipation process. As a result, the heater may generate excessive heat, leading to an overheating condition or triggering a high-limit error. These errors are safety measures to protect the heater and prevent potential damage or hazards.
To clear these errors and restore proper operation, it is crucial to address the root cause of restricted flow by cleaning or replacing the pool filter as necessary. By maintaining clean filters and ensuring efficient flow, pool owners can prevent these errors, prolong the lifespan of their salt systems and heaters, and enjoy a worry-free pool experience.
The errors caused by restricted flow in salt systems and heaters can severely affect the equipment.
When the flow is compromised, the equipment may get additional stress, leading to potential damage or complete system failure.
Continuous operation under restricted flow conditions can strain components such as pumps, valves, heat exchangers, and electrical circuits, which increases the risk of breakdowns or costly repairs.
It is essential to address the underlying flow issues quickly to avoid further damage to the equipment and ensure its longevity.
Restricted flow errors can also directly impact your pool’s temperature and salt levels. Heaters rely on proper water flow to heat the pool water to the desired temperature.
When the flow is restricted, the heater’s performance is compromised, making it difficult to reach and maintain the desired water temperature.
Similarly, salt systems require adequate flow to generate and distribute chlorine levels. Restricted flow can hinder the system’s ability to produce sufficient chlorine, resulting in lower-than-desired salt levels.
These consequences can deteriorate the water quality and potentially be a health hazard for swimmers.
Addressing these errors as soon as possible is crucial to ensure optimal water quality and sanitization.
When you encounter salt system errors potentially caused by restricted flow, it is important to begin the troubleshooting by verifying the functionality of the flow sensors.
Follow these steps to ensure accurate readings and identify any sensor-related issues:
If the salt system errors persist after verifying the flow sensor functionality, cleaning or replacing the flow sensors may be necessary.
Clean the sensors by using a compatible sensor cleaner recommended by the manufacturer. This process typically involves applying the cleaner, allowing it to sit for the recommended duration, and then rinsing thoroughly with clean water. Ensure the sensors are completely dry before reinstalling them.
If cleaning does not resolve the errors or the sensors are damaged, it’s best to contact a pool service professional, such as Romanelli & Son Pool Service, to replace them.
When flow switch errors occur in heaters due to restricted flow, it is crucial to inspect and clean the flow switch to ensure proper functioning; here’s how you can troubleshoot those errors:
If the flow switch errors persist even after cleaning and checking the flow switch, resetting the heater and verifying the flow may be necessary.
Follow these steps to reset the heater and ensure proper flow:
We have explored the most common causes of low pressure in pool return jets. We learned how clogged filters, including DE, sand, cartridge filters, and dirty or damaged filter grids in DE filters, can restrict water flow and lead to decreased pressure.
Regular maintenance and cleaning of pool filters, including backwashing DE and sand filters, and cleaning cartridges in cartridge filters, play a critical role in maintaining optimal water flow and pressure.
A consistent pool maintenance routine can prevent and address low-pressure issues effectively.
If you have complex issues related to low pressure, contacting a pool service professional like Romanelli & Son Pool Service is highly recommended. We have the knowledge, expertise, and specialized equipment to effectively diagnose and address more intricate issues.
Maintaining proper water flow is crucial for a clean and enjoyable swimming experience. Restricted flow diminishes the effectiveness of filtration and circulation and can also impact the performance of salt systems and heaters.